
How to fix Face ID that’s not working on iPhone X iOS 13 update
If your Face ID not working on your iPhone X after the iOS 13 update? If that’s so, then you could be dealing with a temporary Face ID glitch in iOS 13. Read on to find out what to do if Face ID is not working on your iPhone X following the iOS 13 update.
One of the advanced security features entrenched in new iOS device is the so-called Face ID. As the name implies, it’s an advanced authentication technology that uses facial recognition. It offers intuitive and secure authentication that’s activated by the state-of-the-art TrueDepth camera system along with advanced technologies to map the geometry of your face accurately. Normally, Face ID works by unlocking your device, authorize purchases from iTunes, App store, Apple Books and Apple Pay payment with a simple glance. If for some reason, this feature isn’t working on your iphone x following the iOS 13 update installation, I’ve lined up a few handy tweaks you can use to eliminate possible software bugs that might have corrupted the Face ID system.
Troubleshooting FaceID that’s not working on iPhone X after iOS 13 update
Before you begin troubleshooting, be sure to check and make sure that nothing is obstructing the TrueDepth camera. If you’re using a phone case or screen protector, try removing it first. Also clean any residue or dirt that might be covering the camera. Key facial aspects such as your eyes, nose and mouth must be completely visible to the TrueDepth camera. Wearing of sunglasses, particularly those that blocks certain type of lights is also not recommended. Making some adjustments to the position of your device when using it outdoors in bright sunlight may also be necessary. Finally, keep your phone at arm’s length or closer from your face. If you’ve done all these requisites but still couldn’t get FaceID to work on your iPhone X as intended, you may then go ahead and start troubleshooting.
Simple Step to Solve your Face ID Issues
1: Reboot your iPhone (soft reset).
For built-in features that suddenly stopped working from a major system update, they often need a reboot in order to get back up and running smoothly again. Thus, the first recommended solution for you to try on is a soft reset. Just follow these steps if you haven’t already:
Press and hold the Side/Power button and either Volume Up/Down button simultaneously.
Once the Slide to Power Off command appears, release both buttons.
Then drag the power off slider to the right to shut down your iOS device.
After at least 30 seconds, press and hold the Side/Power button again until your iPhone boots up again.
As soon as your phone completely reboots, check to see if Face ID is already working.
2: Disable then re-enable Face ID on your iPhone X.
If restarting the phone doesn’t fix the problem, try to restart the Face ID feature itself. Like apps and system services that are suddenly acting up from an update, the Face ID feature likely needs a refresh for it to adapt with the recent system changes. So here’s what you should do next:
From the Home screen, tap on Settings.
Select Face ID & Passcode then enter your passcode when asked to proceed.
Navigate to the Use Face ID FOR section then turn off the switch next to each option.
If you use Face ID with third-party apps, tap on Other Apps and then turn off the switch next to each app.
Restart or soft reset your iPhone then head back to Settings.
Tap Face ID & Passcode.
Then turn on the switch next to each option.
Also, tap on Other Apps and then turn on the switch for each app.
See if that gets your iPhone X Face ID feature to work in iOS 13 already.
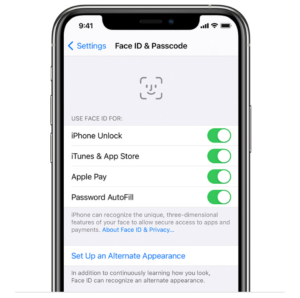
3: Check and manage your FaceID settings.
Some updates override recent settings and thus could possibly result in some conflicts. To clear this out, check and modify your Face ID settings if needed. Just follow these steps:
From the Home screen, tap on Settings.
Select Face ID & Passcode.
Check and ensure that Face ID is set up. Otherwise, set it up accordingly.
Verify if the features that you’re trying to use Face ID with such as iPhone Unlock, iTunes & App Store, Apple Pay, and Password Autofill are enabled. If they’re not, just turn on each of their respective switches.
4: Reset Face ID on your iPhone X.
Your current Face ID information might have been voided after the update and thus it’s no longer working. If this is the case, you will need to reset Face ID so you can set it up again. Here’s how it’s done:
Tap Settings from the Home screen.
Select Face ID & Passcode.
Then tap the option to Reset Face ID.
Tap Set Up Face ID and follow the onscreen commands to set it up again.
Reboot your iPhone once you’re done setting up your new Face ID then try to see if it’s already working as intended.
5: Reset all settings to fix Face ID that’s not working on your iPhone X after iOS 13 update.
Errors that are attributed to incorrect or invalid settings including those inflicted by major system updates can also be remedied by resetting all settings on your iPhone. This will erase all your current settings including customized options and automatic overrides from the recent system update. This doesn’t affect any saved data on the internal memory, so there’s no need to back up files. Just follow these steps:
From the Home screen, launch the Settings app.
Select General.
Scroll to and select Reset.
Tap on Reset all settings option.
Enter your device passcode when asked to continue.
Then select the option to confirm all reset settings on your iPhone.
Your iPhone will restart on its own when the reset is finished. By then you can start enabling individual features so you can use them again. Also verify and ensure that Face ID is enabled.
Finally, Restore your iPhone X in iTunes.
Your last option if all else failed to fix the problem is to carry out a system restore. At this point, you can try wiping your iPhone X and restore its factory default settings through iTunes. You will need to use a computer with the latest version of iTunes software to proceed. Once you’re all set, follow these steps to start erasing and restoring your iPhone X on a computer:
Open iTunes on your computer, if you haven’t already.
Connect your iPhone to the computer with the USB cable or Lightning cable that came with it.
Wait for iTunes to recognize your device and when it does, you should see your iPhone’s icon in iTunes.
Click to select your iPhone X when it appears in iTunes.
Then navigate to the Summary section.
Click on the Restore [iPhone] button.
If prompted, click on the Restore button again to confirm.
This should prompt iTunes to start erasing your device and then installs the latest version of operating system available.
After restoring your device, you can set Face ID up as new.
Leave a Reply